 Upfeedback Docs
Introduction
Welcome to the Upfeedback documentation. Here you'll find everything you need to integrate our feedback widget into your website and leverage our powerful analytics capabilities.
Upfeedback is a comprehensive feedback and analytics solution designed to help you:
- • Collect valuable user feedback seamlessly through a customizable widget
- • Track user behavior to identify patterns and pain points
- • Generate AI-powered insights gathered from your website visitors usage patterns and behavior
- • Make data-driven decisions to enhance your product
Getting Started
Get the Upfeedback widget running on your site in just a few minutes by following these three simple steps.
Sign Up & Create a Project
First, create an Upfeedback account. Once you're in, create a new project for the website where you want to install the widget. Each project represents a separate website or application.
Generate an API Key
Navigate to the API Keys page and generate a new key. This key is required for authentication and ensures that your data remains secure. Note: All your projects will share the same API key, which simplifies management across multiple websites.
Install the Widget
Go to the Embed Widget page, customize your widget's appearance and behavior, and copy the provided HTML code snippet. Add this snippet to your website's HTML just before the closing </body> tag.
Installation
Installing the Upfeedback widget is as simple as copying a single code snippet from your dashboard and adding it to your website.
Script Tag Installation
From the Embed Widget page, copy the generated HTML code block and paste it anywhere before the closing </body> tag of your HTML pages.
<script src="https://upfeedback.com/widget.js"
  data-key="YOUR_API_KEY"
  data-project-id="YOUR_PROJECT_ID"
  data-theme="light"
  data-position="bottom-right"
  data-color="#db2777"
></script>
The snippet from your dashboard will already have your Project ID and customizations included. Remember to replace YOUR_API_KEY with the actual API key from your API Keys page.
How the Widget Works
Our widget uses a Shadow DOM to ensure that its styles don't interfere with your website's existing CSS. This means:
- • The widget's appearance remains consistent across all websites
- • Your website's styles won't affect the widget
- • The widget won't affect your website's styling
When loaded, the widget creates a floating button (if configured to do so) that users can click to open the feedback form. All user interactions are contained within the widget's interface.
Manual Trigger
If you set data-trigger="manual", the floating button will be hidden. You can then open the widget programmatically using a javascript function: window.UpFeedback.open().
This is useful if you want to integrate the widget with your own UI elements, such as a "Feedback" button in your navigation menu.
Implementation Example:
<!-- First, add the widget script with manual trigger -->
<script
  src="https://upfeedback.com/widget.js"
  data-key="YOUR_API_KEY"
  data-project-id="YOUR_PROJECT_ID"
  data-trigger="manual"
  data-theme="light"
  data-position="bottom-right"
  data-color="#db2777"
></script>

<!-- Then, add your custom button anywhere in your site -->
<button id="custom-feedback-button">Send Feedback</button>

<!-- Finally, add the JavaScript to connect your button -->
<script>
  document.getElementById('custom-feedback-button').addEventListener('click', function() {
    // Check if the widget is loaded
    if (window.UpFeedback && typeof window.UpFeedback.open === 'function') {
      // Open the feedback widget
      window.UpFeedback.open();
    } else {
      console.error('UpFeedback widget not loaded yet');
    }
  });
</script>
Available API Methods:
window.UpFeedback.open()- Opens the widgetwindow.UpFeedback.close()- Closes the widgetwindow.UpFeedback.toggle()- Toggles the widget open/closed
Next.js Installation
When installing in a Next.js application, you need to use the next/script component instead of a regular script tag to avoid build errors:
import Script from 'next/script';

// In your layout or page component
<Script
  src="https://upfeedback.com/widget.js"
  strategy="afterInteractive"
  data-key="YOUR_API_KEY"
  data-project-id="YOUR_PROJECT_ID"
  data-theme="light"
  data-position="bottom-right"
  data-color="#db2777"
/>
The strategy="afterInteractive" prop ensures the script loads after the page becomes interactive, which follows Next.js best practices and prevents build errors.
Configuration
All widget configuration is handled through data attributes in the script tag. You can set these easily from the Embed Widget page.
| Attribute | Description | Default |
|---|---|---|
data-key | (Required) Your project's API key. | - |
data-project-id | (Required) Your project's unique ID. | - |
data-theme | Widget theme: "light", "dark", or "auto". | "dark" |
data-position | Widget position: "bottom-right", "bottom-left", "top-right", "top-left". | "bottom-right" |
data-trigger | How the widget is triggered: "floating" or "manual". | "floating" |
data-color | Primary color for buttons and accents (hex). | "#db2777" |
data-text-color | Color for text on primary-colored elements (hex). | "#ffffff" |
data-title | The title displayed at the top of the widget. | "Feedback & Support" |
data-behavior-analytics-enabled | Enable user behavior analytics tracking (true/false). | "false" |
Manual Trigger
If you set data-trigger="manual", the floating button will be hidden. You can then open the widget programmatically using a javascript function: window.UpFeedback.open().
This is useful if you want to integrate the widget with your own UI elements, such as a "Feedback" button in your navigation menu.
Feedback Limits
Free plan users are limited to 10 feedback submissions per month. Once this limit is reached, the widget will display an error message to users attempting to submit feedback. Upgrade to a paid plan for unlimited feedback collection.
The limit automatically resets at the beginning of each month, providing you with a fresh quota of 10 submissions.
Analytics & AI Insights
Premium Feature Our analytics and AI insights system provides powerful tools to understand user behavior and improve your website experience.
Premium Feature
The Analytics & AI Insights functionality is available exclusively on paid plans. Upgrade your subscription to access these powerful features.
How It Works
The analytics system works in five stages:
Collect
When enabled, our lightweight analytics tracker captures user interactions such as clicks, scrolls, and form interactions. The script is designed to have minimal impact on your website's performance, using efficient batching to reduce network requests.
Ingest
Collected data is securely sent to our API, where it's validated and stored. Each event is associated with your project and includes contextual information like the page URL and user session.
Process
Our backend system processes the raw data into structured information, creating both detailed user journey logs and high-level daily summaries.
Analyze
Using Google's Gemini 2.5 Pro AI model, the system analyzes the processed data to identify patterns, user friction points, and opportunities for improvement.
Deliver
Actionable insights are presented in your dashboard, highlighting specific areas for improvement with concrete recommendations.
Enabling Analytics
To enable user behavior analytics:
- Go to the Embed Widget page
- Check the "Enable User Behavior Analytics" option
- Save your changes and update your widget code if you've already embedded it
<script src="https://upfeedback.com/widget.js"
  data-key="YOUR_API_KEY"
  data-project-id="YOUR_PROJECT_ID"
  data-behavior-analytics-enabled="true"
  ...
></script>
Viewing Insights
AI-generated insights are available in the AI Insights section of your dashboard. New insights are generated daily, analyzing patterns in user behavior and providing actionable recommendations.
Each insight includes:
- Observation: What pattern the AI has identified
- Recommendation: A specific, actionable suggestion to address the observation
- Supporting Data: The evidence behind the insight
Data Privacy
Our analytics system is designed with privacy in mind. We do not collect personally identifiable information, and all data is associated with anonymous session IDs. You can view our Privacy Policy for more details.

Frequently Asked Questions
Find answers to common questions about Upfeedback.
How do I change the position or color of the widget?
All visual customizations, including position and color, can be configured on the Embed Widget page. After making changes, simply copy the updated script tag to your website.
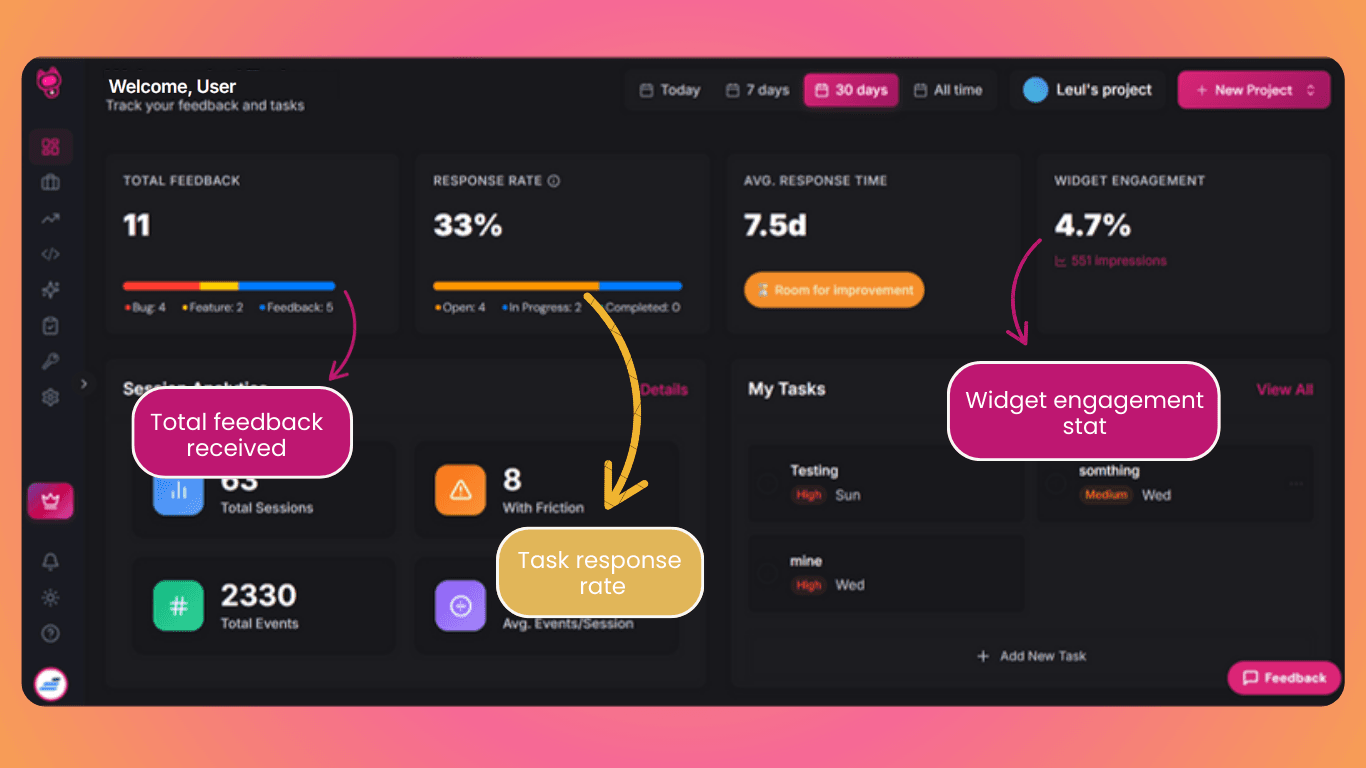
Where can I see the feedback submitted by users?
All submitted feedback is available in your project's dashboard. Log in to your Upfeedback account to view, manage, and analyze the feedback.
Can I trigger the widget with my own button?
Yes. First, set the Trigger option to "Manual" on the Embed Widget page. Then, use the window.UpFeedback.open() function to programmatically open the widget from any click event on your site.
Will the analytics script slow down my website?
No. Our analytics script is designed to be lightweight and non-blocking. It uses efficient batching to minimize network requests and has negligible impact on page load times. The script is loaded asynchronously and won't block your page rendering.
How long does it take to see AI insights?
Initial insights typically appear within 24-48 hours of enabling analytics, depending on your website traffic. The system needs to collect sufficient data to generate meaningful insights. After the initial period, new insights are generated daily.
Can I customize what data is collected?
Currently, the analytics system collects a standard set of user interactions. We're working on adding customization options in future updates. If you have specific requirements, please contact our support team.
Is there a limit to how much feedback I can collect?
Free plan users are limited to 10 feedback submissions per month. This limit resets automatically at the beginning of each new month. Paid plans (Pro and Business) offer unlimited feedback collection. You can view your current usage and remaining quota in your dashboard.
I'm getting build errors when adding the script to my Next.js app. How do I fix it?
When using Next.js, you need to use the next/script component instead of a regular script tag. Import it with import Script from 'next/script'; and use it with the strategy="afterInteractive" prop:
<Script
  src="https://upfeedback.com/widget.js"
  strategy="afterInteractive"
  data-key="YOUR_API_KEY"
  data-project-id="YOUR_PROJECT_ID"
  // other attributes
/>
This prevents the "@next/next/no-sync-scripts" ESLint error during builds.